Subscribe To Rosie Bakes A 'Peace' of Cake

Friday, 30 November 2007

Cranberry & Port Preserve


Cranberries are abundant at this time of year and this preserve would be lovely served in savoury or sweet dishes because it still has that little tang on the taste buds. The port isn’t very visible in taste in this preserve, but adds a little extra touch of splendour for the festive season. This would be lovely as a gift, so why not jazz the jar up a little with a fabric lid or thick Christmas paper and tie with a bow around the lid.


This is the consistency of the preserve - what a wonderful deep red colour from the cranberries.

Cranberry & Port Preserve

Makes 800g (1lb 12oz)

Ingredients
800g (1lb 12oz) fresh cranberries
800g (1lb 12oz) caster sugar
50ml (2 fl oz) Port
Water * see method*
Jam jars – (I used a kilner jar and a small jam jar)
Labels

Method

You will need a preserving pan or a thick-bottomed large pan. Jars & lids, washed and dried, then place the jars onto a baking tray and place into a warm oven to sterilise whilst you make the preserve.

In a preserving pan add all the cranberries, sugar, port and enough water just to cover the bottom of the pan. Place the pan onto a medium heat stir until the sugar has dissolved. Bring up to the boil and keep stirring, (you don’t want the preserve to burn) for approximately 10 minutes or until it has reached setting point. This preserve doesn’t take long to make, due to the pectin in the cranberries being very high.

To test for setting point, place a small plate into the freezer before starting to make the preserve. When you think setting point is reached or it looks a thick consistency, take a teaspoon of the cranberry & port preserve and place onto the very cold plate. Allow about 5 minutes for the preserve to cool and remove the pan off the heat, then with your finger push through the middle of the preserve. It will wrinkle and leave a line down the middle when at setting point. If you haven’t reached setting point, place the pan back onto the heat for a few minutes longer to boil then repeat as before for setting point.

Pot up the preserve into the warm sterilised jars and seal with the lids immediately. When the preserve has cooled place a label on the front and jazz up the jar a little if it’s for a gift.

Wednesday, 28 November 2007

Christmas Sprinkles & Candy Cane Cupcakes

As the festive season is nearly upon us, I thought these little Christmas cupcakes would be appropriate. The candy canes are very simple to make with a little white fondant and red fondant. The Christmas sprinkles add that finishing touch and can be purchased in most supermarkets.
Christmas Sprinkles & Candy Cane Cupcakes
Makes 12 medium cupcakes
Ingredients
175g (6 oz) Self-raising flour
175g (6 oz) softened butter
175g (6 oz) caster sugar
1 tsp vanilla extract
3 eggs, beaten
2 tbsp milk For
The Icing
110g (4 oz) icing sugar, sieved
1 egg white - see note
Few drops of lemon juice
Approximately 50g (2 oz) white fondant Icing, for the candy canes
Edible red food colouring
Sugar Christmas sprinkles
12 foil baking cups – I used Wilton Gold
Method
Preheat oven 200°C/fan oven 180°C/400°F/Gas mark 6. Line a cupcake tin with 12 foil cupcake cases.
In a bowl cream the butter and sugar together until light and fluffy. Add the beaten egg, milk and vanilla extract a little at a time to the mixture until all combined. Fold in the flour making sure all the mixture is smooth and well combined together.
Place approx a dessertspoon of the mixture into each cupcake case (I like mine to be no more than three quarters full of mixture).
Place into the preheated oven on a middle shelf for 15 – 20 minutes or until firm to the touch and golden in colour. You can also check by using a skewer inserted into the middle of a cake, when it comes out clean the cakes will be cooked. Place the cupcakes onto a wire rack to cool.
For The Candy Canes. Divide the fondant icing into two and with the red colour paste add a little onto a cocktail stick and then onto the half of fondant icing. Work the fondant until the colour is an even red colour and roll into a sausage shape. Take the white fondant icing and roll this into a sausage shape too. Lay each sausage of red and white fondant side by side and pinch together at each end. Twist the strands gently so they resemble candy canes then cut into lengths and curve one end.
For the icing: In a bowl place the sieved icing sugar and add few drops of lemon juice and egg white. Beat until the icing becomes smooth and a good spreadable consistency. Take a teaspoon of icing and ice each cake then sprinkle on the Christmas sprinkles and add a candy cane in the middle.
Note: You can find the Christmas sprinkles in most supermarkets. I used Edible Sugar Flare colour paste in this recipe. You could always use powdered egg white for the icing if you do not want to use fresh egg white.

Saturday, 24 November 2007

Hot from the press & into my oven - stout, oat and honey knots

Freshly baked from the oven and cooling


Dan Lepard’s striking stout, oat and honey knots were a ‘piece’ of cake to bake from his exclusive recipe posted 23rd November 2007 in “The Word of Mouth Guardian ”

I just couldn’t wait to try this recipe out today. I’ve never baked bread with stout and oats before so this was a brand new venture for me. Mixing, kneading and proving the dough before baking may seem time consuming, but in-between sit back, kick off those shoes and relax. I found Dan’s recipe very instructive every step of the way, don’t be hesitant and give this recipe ago.

I really can’t begin to describe that wonderful smell of freshly baked bread wafting through my kitchen. My taste buds tingled in anticipation for that first bite into one of those delightful stout, oat and honey knots.

I wasn’t far wrong in my assumptions of them being good, and they would be gorgeous served as a Ploughman’s lunch. There’s none of that pappiness in these rolls, which you get from mass produced bread!

I will defiantly be baking these time and time again…….

Friday, 23 November 2007

Banana Butterscotch Loaf

We have "7 wonders of the world" and if this loaf cake came into those stakes I’m sure it would be listed in this title. If you could imagine biting into a moist banana loaf, you are only halfway there with this little beauty. Throw into the mix Green & Black’s Butterscotch chocolate and pecans, now the picture begins to form of what an outstanding treat we have here. Even better still, it’s an easy cake to make too! Don’t take my word for it, I urge you to try this recipe out yourself.


Banana Butterscotch Loaf
Cuts into 15 slices

Ingredients
A little butter to grease
175g (6oz) plain flour
2 tsp baking powder
½ tsp each of bicarbonate of soda and salt
175g (6oz) light muscovado sugar
2 large eggs
3 medium ripe bananas, mashed
150g Green & Black’s Butterscotch chocolate, chopped
150g pot natural yoghurt
100g (3 ½ oz) pecans, chopped
1-2tbsp Demerara sugar

Preheat the oven to 170ºC/fan 150ºC/325ºF/ mark 3.

Grease and line a 1.4kg (3lb) loaf tin with greaseproof paper.Put the flour, baking powder, bicarbonate of soda and salt into a large bowl and mix together.In a separate bowl, beat together the sugar and eggs until pale and fluffy. Stir in the bananas, chopped chocolate, yoghurt and 50g (2oz) pecans, followed by the flour mixture.Spoon into the tin, sprinkle with remaining pecans and the Demerara. Bake for 1hr or until a skewer inserted in the centre comes out clean. Cool in the tin, turn out and slice.

Store wrapped in foil in an airtight tin.

Thursday, 22 November 2007

Christmas Fruitcake


An elderly lady who baked this cake every year kindly passed this recipe onto me many years ago. I would assume this recipe would be at least forty years old if not more! It has all those wonderful ingredients for making a good rich fruitcake. Black treacle brown sugar, and a little cocoa powder give this cake its lovely dark colour. Brandy adds that little extra special touch to the flavour and texture after “feeding” the cake for several weeks. You can see the brandy on top of the cake after its first feeding in the above pic.

I would advise a little time is spent preparing the cake tin to ensure its lined and greased well before starting on the cake mixture. I always have a hand written list of ingredients to tick off as I follow the recipe with it being such a long list, I wouldn’t want to miss adding anything!


Christmas Fruitcake

Ingredients
225g (½ lb) plain flour
1 tsp mixed spice
½ tsp cinnamon
½ tsp freshly grated nutmeg
1 tsp cocoa powder
175g (6 oz) soft butter
175g (6 oz) soft dark brown sugar
2 tbsp black treacle
Grated zest 1 lemon
Grated zest 1 small orange
4 medium eggs
500g (1lb ¼ oz) mixed dried fruit, currants, sultanas and raisins
100g (4 oz) chopped mix peel
100g (4 oz) chopped flaked almonds
50g (2 oz) chopped glace cherries, washed and dried
4 tbsp of Brandy
2 tbsp milk
Brandy for “feeding” the cake
2 tbsp of brandy for feeding after baking
Extra brandy for “feeding” the cake every week

Method

You will need 20cm (8 in) round cake tin or 18cm (17 in) square cake tin. Brush the cake tin with melted butter. Line the base and sides with double thickness if greaseproof paper. Grease the greaseproof paper with more melted butter.

When the cake mixture is in the tin, you will need to tie double thickness of baking paper or news paper around the outside of the tin, allowing it to stand proud 2.5cm (1 in) above the tin.

Preheat oven to 150°C/fan 140°C/300°F/Gas mark 2.

In a large mixing bowl add the butter and sugar and beat together until light and fluffy. Add the treacle, lemon zest and orange zest and beat in well. Add an egg one at a time beating in until all combined into the mixture.

Stir in the mixed fruits, chopped peel, nuts and glace cherries making sure they are all coated in the mixture well.

Sift the flour, mixed spice, cinnamon, grated nutmeg and cocoa powder. Fold into the mixture alternately with the brandy and milk.

Place all the mixture into the prepared cake tin; smooth the top with a spatula leaving a small indentation in the middle to help prevent the top from doming.

Place the brown paper tied around the outside of the tin as instructions above.

Place into the preheated oven for about 3¼ - 3 ½ hours or until a skewer inserted into the centre of the cake comes out clean. If the top is browning to quickly cover loosely over with a circle of baking paper.

Leave in the cake tin until completely cooled then remove the greaseproof paper, make little holes into the top of the cake and pour the 2 tablespoons of brandy over.

Wrap the cake in clean greaseproof paper and foil and store in an airtight tin. Every week unwrap the cake and feed it with a little brandy then wrap the cake back up and store as before.

Note. This cake will keep well wrapped and stored for 3 months.

Tuesday, 20 November 2007

Oggies – Traditional Cornish Pasties

I have very fond memories of a holiday taken in Bude Cornwall where a wonderful little bakery shop was found turning out the Traditional “Oggy” Cornish Pasty. You know when something is excellent by the queues of people waiting just not inside the shop, but also spilling out onto the street for that just baked pasty coming out of their ovens. The pasties would be placed into paper bags and eaten by me and my family sat by the sea while still warm, with mouth-watering shortcrust pastry, tender little chunks of meat and vegetables, what delectable delight that was.

I have tried to recreate here those fond memories in my own pasties, isn’t it strange how food can enchant you back to pervious times! To think this was the traditional packed lunch for the tin miners in Cornwall. I am lead to believe one end of the pasty would be filled with meat and veggies and the other end filled with jam or fruit.


Oggies - Cornish Pasties

Makes 4

Ingredients
For The Shortcrust Pastry
450g (1 lb) plain flour
100g (4 oz) butter
100g (4 oz) vegetable shortening or lard
Pinch of salt
Cold water to mix, I use 1 tsp for every 25g (1 oz) of flour used
1 egg yolk with a little water, egg wash for glazing the pastry
For The Filling
350g (12 oz) stewing beef , chopped into small pieces
1 raw potato, cut into very small dice
Raw swede about the same amount as potato, cut into very small dice
Small onion, sliced into very small dice
Sal & pepper
4 small-diced pieces of butter
A little flour for sprinkling onto the meat

Method

You will need a large baking tray, lined with non-stick paper. Preheat the oven to 220°C/fan 200°C/425°F/Gas mark 7.

To make the pastry, in a food processor add the flour, butter, vegetable shortening or lard. Blitz together until the mixture resembles breadcrumbs. Add the cold water and blitz again until it forms into a ball. Take out of the food processor and wrap in cling film and place in the fridge until chilled. Roll out the pastry on a lightly floured surface to about 5mm (1/4 in). With a side plate as a template cut round until you have 4 circles, (you may need to re-roll the pastry).

For The Filling. Firstly divide the vegetables into 4 and also the meat. Place in the centre of each circle of pastry, half of the divided vegetables then the meat season with salt and pepper a sprinkle of flour and the remaining vegetables. With a pastry brush egg wash all the way around the outside rim of the pastry, and gently bring the pastry together at the top. Crimp the pastry top with your thumb and forefinger. Place on the prepared baking tray and make a little slit in the top to allow the steam to escape when cooking. Lastly give the pasties a good glaze of egg wash and place into the preheated oven.

Cook for 20 minutes at the stated oven temperature, and then lower the oven temperature down to 180°C/fan 160°C/350°F/Gas mark 4, and cook for a further 40 minutes. If the pastry appears to becoming too brown, place a sheet of baking paper loosely over the top of the pasties to help prevent them from burning.

Serve hot or cold.

Note. If you don’t want to make your own shortcrust pastry there are some good ready-made pastry’s you can buy now.

Sunday, 18 November 2007

"Let Them Eat Cake -Afternoon Teatime Cake"


I fancied having a little fun baking today, and this is how my “Afternoon Teatime” cake came about. I used a Madeira cake this time for my sponge base, which has a denser crumb than a Victoria sponge for fondant icing. The teatime objects on the cake could be made the day before, giving plenty of time for them to dry out before adding to the cake.

Afternoon Teatime Cake

Serves 6 –8

Ingredients
For the Madeira cake
350g (12 oz) plain flour
2 tsp baking powder
250g (9 oz) soft butter
250g (9 oz) caster sugar
4 eggs, lightly beaten
1½ tbsp lemon juice
3 tbsp milk
Apricot Glaze
1 tbsp apricot jam
4 tbsp water
For The Icing
700g (1½ lb) fondant icing (sugar paste)
Edible colour pastes –of your choice
Edible glitter
Icing sugar
A round cake board 20cm (8 in)
You may also need a small paintbrush to colour the fondant cups, teapot, plates, serving plates etc, if using.

Method

Grease and line a 20cm (8 in) round springform cake tin. Preheat the oven to 160°C/Fan 140°C /325°F/Gas mark 3.

In a mixing bowl add the butter and caster sugar and beat until light and fluffy. Add the beaten egg a little at a time until fully combined. Sieve the flour and baking powder together then fold in gently with a large spoon. Ad the lemon juice and the milk add fold in carefully.

Spoon the mixture into the prepared cake tin and level the top with a spatula. Place into the preheated oven and bake for 1½ - 1¾ hours or until golden brown and firm to touch and a skewer inserted into the middle comes out clean.

Leave to cool in the tin for 1o minutes before turning out to fully cool on a wire rack.
When the cake is cooled completely in a saucepan add the apricot jam and water and heat gently together until full combined. Cover the top and sides with this jam from the saucepan.

Colour 350g (12 oz) of the fondant icing. Roll out on a lightly dusted work surface of icing sugar. It needs to be large enough circle to cover the whole cake. Carefully place the rolled icing over the whole cake and smooth the top and sides cutting off any surplus icing around the bottom. Re-roll the surplus icing into a sausage shape and stick with the apricot jam to the bottom of the cake all the way around and making sure it is smooth.

With 175g (6 oz) of the fondant icing, roll out on a lightly dusted work surface of icing sugar. It needs to be large circle enough to cover as a tablecloth. With a little water and a pastry brush lightly damp the top of the cake (not the sides) of the coloured icing already on the cake. Centrally place the icing tablecloth onto the top smooth down to stick. With a little water and a pastry brush on the side of the icing for the tablecloth, stick a section down then leave a section carrying on until you have like a fluted edge as in the picture.

With the remaining fondant icing, colour and shape the fondant icing into plates, sandwiches, cakes, buns, teapot, cups and saucers, spoons and cake slice. Using a little water to stick the items down onto the top of the cake. Add a little edible glitter to some of the cakes for that extra sparkle.

Note. If the cake is becoming to brown in the oven before it is fully baked, add a circle of baking paper over the top to prevent it burning.

You can take a small paintbrush and add dabs of edible colour onto your figures if you choose to do so.

Thursday, 15 November 2007

Pudsey Bear Cookies

In the U.K. tomorrow it’s BBC Children In Need Appeal raising funds for underprivileged children. A few weeks ago I brought some Pudsey Bear cookie cutters from Lakeland Kitchen Shop, where a donation from this sale also goes towards the appeal.

I thought it would be fun to bake a few of these cookies in gingerbread dough. This would be a great bake to make with the children and let them go crazy with their design in the icing department!

Of course you could bake the original recipe [link here] following instructions on how to ice the cookies too.

Here is my recipe for the gingerbread dough.

Gingerbread Cookies

Makes 10 – depending on size of cookie cutter used, it could be more/less

Ingredients
350g (12 oz) self-raising flour
Pinch of salt
2 tsp ground ginger
100g (4 oz) golden syrup
75g (3 oz) butter
2 tbsp caster sugar
1 egg, lightly beaten

Method

You will need 2 baking trays, lined with non-stick baking paper.

Preheat the oven to 180°C/fan 160°C/350°F/Gas mark 4.

Sieve the flour, salt and ground ginger into a large mixing bowl, leave to one side.

In a saucepan add the golden syrup, butter and sugar, heat on the stove on a low heat until melted. Leave to cool just for a little while, then add to the flour mixture with the egg. Stir with a wooden spoon until it starts to form together and then bring the dough together with your hands. Knead the dough until smooth and wrap in cling film and place in the fridge to chill for 30 minutes.

Slightly dust a work surface with a little flour and roll out the unwrapped dough to about 1cm (½ in). Using a cookie cutter cut out the shapes and re-roll the dough cutting out more shapes until all the dough is used.

Place the cookies onto the prepared lined baking trays and bake in the preheated oven for 10 – 15 minutes until slightly golden in colour. Place carefully onto a wire rack to cool completely.

Wednesday, 14 November 2007

The Great British Pudding Challenge - Chocolate Pudding

This month for “The Great British Pudding Challenge”, I picked up the gauntlet and knuckled down into making my chocolate steamed pudding. I wasn’t sure at first if I was serving this pudding with custard or chocolate sauce. I think the chocoholic in me got the better, and I made a glossy chocolate sauce. The recipe for the chocolate sponge pudding, which is posted on my Blog [link here], was straightforward, but I added another tablespoon of milk to make the mixture a little slacker. I used Green & Blacks milk chocolate to add into the sponge mixture, I’m quite a fan of their chocolate :)


I am SO looking forward to viewing the entries from fellow Bloggers.

Happy challenge to everyone :)

Recipe for the pudding is on this [link here], should it tempt anyone else to join in, the more the merrier and you’d be very welcome to take the challenge too.

Chocolate sauce

Ingredients
200g of milk chocolate
150ml double cream
2 tsp camp coffee, or whatever coffee you wish
1 tbsp Golden syrup
Knob of butter

Method

In a saucepan add all the ingredients except the butter and melt very gently on a very low heat on the stove, stirring all the time. When the chocolate is melted and the mixture is smooth add the knob of butter stirring it in.

Serve the chocolate sauce while still warm over the chocolate sponge pudding.
EDIT POST 18TH NOVEMBER 2007
Our 2nd challenger has posted!
Jules from Trainee Domestic Goddess has posted on her Blog her wonderful entry of Chocolate Pudding & "real" custard. Please DO head over to Jules Blog to view her entry.
EDIT POST 18TH NOVEMBER 2007
Our 3rd challenger has posted!
Esther at The Lilac Kitchen has posted on her Blog her wonderful entry of Chocolate Pudding & cream. Please DO head over to Esther's Blog to view her entry.
EDIT POST 30TH NOVEMBER 2007
Our 4th challenger has posted!
Antonia at Food Glorious Food has posted on her Blog her wonderful entry of Chocolate Puddings with Orange Ice Cream.. Please DO head over to Antonia’s Blog to view her entry.

Monday, 12 November 2007

Iced Sugar Cookies

I thought I’d have a spot of light baking in the kitchen with these cookies to brighten up an autumn day! The texture has a nice crunch and I think they may even suit a children’s party theme too. Have fun experimenting with shapes, colours and sprinkles! If you haven’t quite enough icing depending on how thick you make it, they also taste fantastic as a plain cookie :)

Iced Sugar Cookies

Ingredients
200g (7 oz) self-raising flour
50g (1 oz) cornflour
110g (4 oz) butter
110g (4 oz) caster sugar
1 egg
Few drops of vanilla extract
1 tbsp milk or enough to bring the dough together
For The Icing
150g (5 oz) icing sugar, sieved
Few drops of lemon juice
A little water
Edible food colours of choice
Sugar sprinkles for decoration
Round cookie cutter

Method

You will need 2 - 3 large baking trays covered with non-stick baking paper. Preheat the oven to 200°C/fan 180°C/400°F/Gas mark 6.

In a large mixing bowl sieve the flour, salt and cornflour. Add the butter and rub in with your fingers until it resembles breadcrumbs, then stir in the sugar. Beat the egg and vanilla extract together in a small jug and add to the mixture. Add the milk form the dough together with your hands into a ball; it will be a soft dough.

Chill the dough for about 30 minutes to 1 hour in the fridge wrapped in cling film. Lightly dust a work surface with a little flour and roll the dough out to a thickness of 5cm (2 in). Stamp out the cookies and then lay them on the prepared baking trays, (Re-roll the dough and stamp out more cookies until all the dough is used).

Place in the preheated oven for 10 – 15 minutes or until lightly golden brown. Leave to cool for about 5 minutes before transferring to a wire rack to cool.

For The Icing. Sieve the icing sugar into a mixing bowl. Add the lemon juice and a little water then beat until smooth. The consistency should be runny but stiff enough to coat the cookies. Dived the icing into three bowls and add the food colours of choice and coat the cooled cookies with icing and sprinkle over the sugar sprinkles. Leave the icing to set for a little while before eating or storing away.

Makes 20 – 30 cookies (depending on the size of cookie cutter you use).

Sunday, 11 November 2007

Remembrance Day Poppy ‘Peace’ of Cake


"They shall grow not old"

They shall grow not old, as we that are left grow old: Age shall not weary them, nor the years contemn. At the going down of the sun and in the morning We will remember them.

Laurence Binyon (1869-1943)


Remembrance Day Poppy ‘Peace’ of Cake

It is Remembrance Day today in Britain so I have baked a cake in honour of this day. November is the time of the year when we wear a red poppy in memory of those who sacrificed their lives for Queen and Country during wars.


The cake is basically a Victoria sponge cake filled with butter cream and blackberry conserve. The covering is fondant icing and the poppies are made up with coloured fondant icing.

Serves 8

Ingredients
For The Sponge
175g (6 oz) self-raising flour, sieved
175g (6 oz) soft butter
175g (6 oz) caster sugar
3 eggs
1 tsp vanilla extract
2 tbsp milk
For The Filling
2 tbsp blackcurrant conserve
25g (1 oz) soft butter
50g (2 oz) icing sugar sieved
1 tbsp milk
Few drops of vanilla extract
To Stick The Icing to the Cake
1 tbsp apricot jam
3 tbsp water
For The Icing
500g (1 lb 2oz) fondant icing
Edible food colouring, red, black and green
Edible cake glitter

You will need 2 sandwich tins 20cm (8 in) greased and the base lined with greased greaseproof paper.

Method

Preheat oven to 200°C/Fan oven 180°C/400°F/Gas mark 6.
In a bowl add the softened butter, sugar and beat until light and fluffy. Add the beaten egg a little at a time, then vanilla extract until all combined. Fold in the flour gently and then fold in the 2 tablespoons of milk. Divide the mixture equally into each sandwich tin and place in the preheated oven, middle shelf for 20 – 25 minutes or until cooked. The tops should spring back slightly when lightly touched and a skewer inserted into the middle of the sponge should come out clean when cooked.Leave in the tins for 10 minutes before turning out onto a wire rack to cool.Make the Butter Icing.


In a bowl cream the butter and icing sugar together until light and fluffy. Add the vanilla extract and milk and beat again until all combine. Leave to one side and cover with cling film until required.When the sponges are cold, take one sponge for the bottom of the cake and spread with blackcurrant conserve and the butter icing, then place the second sponge on top.

For The Apricot Jam
Put the apricot jam and the water into a saucepan and heat on the stove on a low heat and give it a stir until it’s a smooth texture. This will be sticking the fondant icing to the cake.


For The Icing
Take the fondant icing and work it a little in your hands to make it pliable. Lightly dust the work-surface with a little icing sugar and with a rolling pin roll out ¾ of the fondant icing large enough to cover the whole cake.

With a pastry brush cover the whole sponge with the warmed apricot jam from the saucepan.

Carefully with your rolling pin lift the rolled fondant icing and ease it over the sponge cake covering the whole cake. Smooth the icing down on to the cake gently and cut off any excess overhang.

With the overhang fondant remains, colour this red and cut into a band to fit around the middle of the cake. You may have to cut two strips and stick down with apricot jam and smooth the red fondant out and the joins if you have any.

For The Poppies
Colour ¾ of the remaining fondant icing you put to one side red. With the remaining icing cut this in half and colour one-half black and one half green. Roll balls of red fondant enough to cover the cake as in the picture (8 poppies for around the side and 1 large poppy for the top), then flatten them down and cut four V shapes out and then mould into poppy petals. Roll small balls of black icing and flatten and stick on with a little of the apricot jam in the middle of the poppy. With green roll into a length and flatten with you fingers shaping into a leaf. With a knife make veins onto the leaf and stick it to the back of the poppy. For the centre poppy you will need to make a stem with the green icing by rolling into a cigar shape and also sticking this onto the back of the poppy.

Stick one poppy into the middle of the cake on top and sprinkle edible glitter over. Stick the remaining 8 poppies around the side with apricot jam and sprinkle with edible glitter

Saturday, 10 November 2007

Anzac Biscuts


The gauntlet was laid down for a challenge by cookie at The Cooks Journal to bake Anzac biscuits. How exciting to partake and being a lovely bake too how could I hold back? *giggle* These are fun biscuits to bake and taste divine. I haven’t baked these for such along time I had forgotten just how good they taste!! Thanks cookie for the challenge and I hope I have done your challenge justice.

This recipe is from Good Food on this link

Friday, 9 November 2007

The Great British Pudding Challenge


I’m laying down the gauntlet to try and keep the Great British Pudding from becoming extinct. You are most welcome to join in with me in this challenge!! The more the merrier but don’t forget to let me know you are partaking so I can link into our posts to view each other’s blogs.

How does this work? Each month I will be choosing a pudding a Traditional British Pudding. . I will post the recipe each month. You are invited to join me in my quest of “The Great British Pudding Challenge”. Anyone can join in whatever nationality. I do ask that you please leave a link on the most resent posted month’s pudding with a comment if you join in to enable me to link up your site for the round up.

The Great British Pudding Challenge is under way for this month starting from today until the end of the month 30th November.

I adore chocolate so I thought it quite fitting to start the Challenge with a chocolate steamed pudding *smile*. I am including a recipe here and Happy Pudding Challenge to everyone. Lastly please would you let me know when you have completed your challenge so we can view each other’s lovely puddings and also link in our challenges on our Blogs.


Chocolate Steamed Pudding

Serves 4 –6

Ingredients
110g (4 oz) self-raising flour
27g (1 oz) good quality cocoa powder
110g (4 oz) soft butter
110g (4 oz) caster sugar
2 eggs
2 tbsp milk
55g (2 oz) chopped chocolate, of choice

Method

You will need a 900g (2 lb) pudding basin, greased with a little butter, greased greaseproof paper and foil to cover the top of the basin and a little string to secure the paper and foil.

Place a steamer on to boil and then lower to a simmer in readiness for cooking the pudding.

In a large mixing bowl add the butter and caster sugar and beat together until light and fluffy. Add one egg at a time beating in until fluffy and fully combined.

Sift the flour and coco powder together fold gently into the mixture. Add enough milk to make the mixture into a dropping consistency and mix until all combined. Lastly fold in the chopped chocolate of your choice.

Spoon the mixture into the prepared pudding basin filling it three-quarters full and with a spoon level the top.

Make a circle large enough to fold a pleat in the middle to place on top of the pudding, leaving enough to come down the sides, do the same with the foil too. After placing the greaseproof paper and foil on top of the pudding basin, tie string around the top half of the basin and secure tightly, then take the string over the top of the pudding tying down to make a handle to lift the pudding out. Place the pudding into the steamer and steam for 2 hours, do not let the steamer boil dry and replenish the water as necessary.

You could serve this pudding with custard, chocolate sauce, ice cream, whipped cream the choice is yours.

Note. You could use orange chocolate and a little orange zest to make it into a choc-orange combo.


Keep The Flag Flying For Traditional British Golden Syrup Pudding


I watched the BBC news this week in utter disbelief that a national favourite of steamed puddings are in danger of becoming extinct! I am still flying the British flag for traditional puddings and standing in its corner in my household. I don’t confess to eating puddings every day, but what a splendid treat to eat on a cold and blustery day. Can you imagine cutting through soft sponge and coming to the ultimate prize of luscious golden syrup and then but not least, a trickle of custard that weaves its way through the sponge, oh my, sheer delight!


Here is my recipe to help keep a tradition alive.

Golden Syrup Sponge Pudding

Serves 4 – 6

Ingredients
110g (4 oz) self-raising flour
Pinch of salt
110g (4 oz) soft butter
110g (4 oz) caster sugar
2 eggs
A few drops of vanilla extract
2 tbsp milk
3 tbsp Golden Syrup

Method

You will need a 900g (2 lb) pudding basin, greased with a little butter, greased greaseproof paper and foil to cover the top of the basin and a little string to secure the paper and foil.

Place a steamer on to boil and then lower to a simmer in readiness for cooking the pudding.

Add the Golden syrup into the bottom of the pudding basin.

In a mixing bowl add the butter and sugar and beat together until fluffy and light. Add one egg at a time beating well into the mixture, and then beat in the vanilla extract. Sieve the flour and salt together and fold gently into the mixture. Add enough milk to make the mixture into a dropping consistency and mix until all combined. Spoon the mixture into the prepared pudding basin and with a spoon level the top.

Make a circle large enough to fold a pleat in the middle to place on top of the pudding, leaving enough to come down the sides, do the same with the foil too. After placing the greaseproof paper and foil on top of the pudding basin, tie string around the top half of the basin and secure tightly, then take the string over the top of the pudding tying down to make a handle to lift the pudding out.Place the pudding into the steamer and steam for 2 hours, do not let the steamer boil dry and replenish the water as necessary.

Turn the pudding out onto a plate large enough to catch any syrup that may run down the sides. Slice into portions and serve while hot with lashing of custard.

Thursday, 8 November 2007

Historic Eccles Cakes


You just know when something is worth its weight in gold in the baking stakes, and Eccles cakes are one of them. These little delights have been around since the late 1700’s and were being sold at that time by James Birch from his little corner shop in Eccles, England. Just let your mind wander into the delights of dried fruit & mixed candied peel, soft brown sugar, butter and spice encased in mouth watering buttery puff pastry. This gorgeous delight is what awaits in this bake. I take the easy route and buy my puff pastry these days. Even pastry chefs who have trained in this art have been known to do the same too! My recipe may not be 100% spot on to the original but just as delicious.

Eccles Cakes

Makes about 10

Ingredients
500g (1 lb 2 oz) pack of butter puff pastry, (I used only half and froze the rest)
25g (1 oz) soft butter
25g (1 oz) soft brown sugar
25g (1 oz) mixed candied peel, chopped
50g (2 oz) currants
½ tsp mixed spice
1 egg white
Caster sugar for the topping

You will need 2 baking trays greased or lined with non-stick mats, a round pastry cutter measuring 10cm (4 in).

Method

Preheat the oven to 220°C/fan 200°C/400°F/Gas mark 6.

In a bowl mix the butter, brown sugar, candied peel, currants and mixed spice.

On a lightly floured surface roll out half the quantity of puff pastry (as stated in the ingredients) thinly and cut out 10 circles measuring 10cm (4 in) each.

In the middle of each pastry circle place a teaspoonful of the mixture and draw the edges together to meet the middle and completely seal in all the filling. Turn over so the join is underneath and roll out with a rolling pin until the currants are just showing.

Place onto the prepared baking trays and leave to rest for about 10 minutes in a cool place.

With a sharp knife make three slits on top of each cake, then brush each one with egg white and sprinkle caster sugar over the top.

Place into the preheated oven and cook for about 15 minutes or until golden brown and crisp. Place on a wire rack to cool.

Wednesday, 7 November 2007

Old fashioned Christmas Pudding


I know it isn’t stir up Sunday until November 25th this year however, I wanted to get ahead a little with my puddings. Everyone in my household has a good stir of the pudding mixture and makes a wish. I still like to keep this tradition alive and I hope that their wishes do come true! I don’t put objects like thimbles or coins into my puddings but I’m sure somewhere this tradition carries on.

This is an old-fashioned Christmas pudding that is moist and full of Christmas cheer. This recipe has been in my family for many years having been originally handed down through an elderly friend. You’ll need to start the pudding mixture the night before to soak all the ingredients in brandy and Guinness. These puds will keep well stored in a cool dry place and come to maturity in time for Christmas.
Old fashioned Christmas Pudding

Makes 2 x 900g (2 lb) puddings or 4 x 450g (1 lb) puddings

Ingredients

350g (12 oz) sultanas
350g (12 oz) raisins
225g (8 oz) glace cherries, washed, dried and cut into pieces
225g (8 oz) soft brown sugar
½ tsp salt
1 cooking apple, grated unpeeled, excluding pips and core
1 grated carrot
Zest of lemon
Zest of orange
110g (4 oz) chopped almonds
½ tsp mixed spice
1 tbsp black treacle
½ glass of brandy
350ml (12 fl oz) Guinness
225g (8oz) breadcrumbs, white or brown
110g (4 oz) plain flour, sieved
3 eggs
225g (8 oz) suet

You will need pudding basin’s 2 x 900g (2 lb) or 4 x 450g (1 lb). Greaseproof paper, foil and string.

Method

This mixture is started the night before to develop all the flavours before placing into pudding basins to steam.

In a very large bowl add the flour, spices, suet, breadcrumbs and sugar give a stir to mix them through. Tip in the fruit, zest, cherries, carrot and apple then stir well to mix. Add all the remaining ingredients beat until thoroughly combined. Leave the bowl in a cool place covered over with a tea towel overnight. Next day give the mixture another good stir and leave to one side while you prepare the pudding basins.

Grease your chosen size of pudding basins and fill each one three-quarters full. Cover with tops of the puddings with greased greaseproof paper. Cover over the tops with pleated foil in the middle of each basin. Tie securely down the coverings with string around the lip of the basin top.

Each pudding needs to be steamed in a steamer for 6 – 8 hours depending on size. Keep topping the steamer up with boiling water and don’t let it boil dry. Leave to cool completely before removing the coverings. Recover with fresh greased greaseproof paper, foil and string.

Store in a cool dry place.

Re-steam for 3 – 4 hours before serving and turn out onto a warm plate. You can warm 3 – 4 tbsp brandy pour over the pudding and set alight.

Serve with Brandy sauce, custard, rum butter or brandy butter.

Tuesday, 6 November 2007

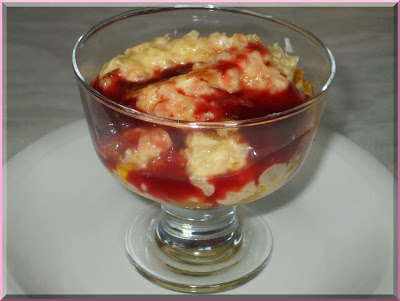
Traditional Rice Pudding with Raspberry Sauce

Now we are into autumn in the U.K. my family crave traditional desserts. Desserts are not something that we eat everyday but, when we do, I like to make them something that just hits that spot of it being pure comfort food! Rice pud evokes childhood memories in most people, remember that warm glow you feel when you slip that first spoonful into your mouth? This is pure velvetiness at its best.

My rice pudding has a wonderful yellow colour from the Jersey cream I use, but of course you could use double (thick) cream instead. The raspberry sauce is a simple affair and very easy to make, if I dare call it a sauce here, although it is a nice complement to the creamy rice.

Traditional Rice Pudding with Raspberry Sauce

Serves 4

Ingredients
50g (2 oz) short grain rice, for rice pudding
50g (2 oz) caster sugar
25g (1 oz) butter, cut up into pieces
570ml (1 pint) full cream milk
275ml (1/2 pint) Jersey cream
Freshly grated nutmeg
For The Sauce
1 - 2 tbsp of a good raspberry jam
7 – 8 tbsp water
1 tsp Framboise Liqueur (Raspberry) more if you prefer

Method

You will need an ovenproof dish that is greased with a little butter.
Preheat the oven to 140°C/275°F/Gas mark 1.

Place all the ingredients except the nutmeg into the prepared ovenproof dish. Give the top a good grating of fresh nutmeg.

Place onto the oven and cook slowly without stirring for about 2 hours. The top of the pudding will form a wonderful nutmeg skin and the rice underneath will be thick and creamy.

Meanwhile whilst the pudding is cooking make the sauce by adding all the sauce ingredients into a saucepan. Heat through on a low heat on top of the stove and stir until all the ingredients combine together. If you don’t like the seeds in the sauce, place through a sieve then return to the saucepan to heat through. Serve the sauce hot drizzled over the rice pudding.

Note. The rice pudding can be eaten hot or cold, the choice is yours. If the sauce becomes to thick add extra water.

Monday, 5 November 2007

I have been tagged - my first tag

I have been tagged by Janice famersgirl this is my first tag so it’s very exciting for me - thanks Janice :)

These are the rules:1. Link to your tagger and post these rules.2. Share 7 facts about yourself: some random, some weird.3. Tag 7 people at the end of your post and list their names (linking to them).4. Let them know they've been tagged by leaving a comment at their Blogs. Here are seven random facts about me.

7 facts about me:

1. I have green- blue eyes and dark brown hair
2. I’m very short really at only 5ft 2in and dumpy from my love of food
3. I used to be a vegetarian as a child and I was very finicky about food
4. My favourite cookery book has to be by Nigella Lawson ‘Feast’
5. I have a fondness for chocolate be it white, milk or dark
6. My mother taught me how to make pastry when I was about 7 yrs old
7. I could cook a full roast dinner at the age of 12 yrs

Ok so whom do you tag?

Ange (who was my inspiration to start a Blog)
Antonia (beautful writing and pics)
Jules (whom I don't think needs any training - wonderful foodie Blog)
Jeena (A great Blog with all her own recipes from her kitchen)
Caty ( Another great Blog and vegan too )
healthy snack box (Great to visit when I need something healthy to eat after all these cakes lol)
Maria (lastly but not least - my friend who has just started Blogging and inspires me too)

I have tagged all the above because they all have wonderful Blogs and give inspiration and they have passion in their love of food – thanks folks :)

HAVE A SAFE & HAPPY BONFIRE NIGHT TOO EVERYONE

Sunday, 4 November 2007

Dynamite Smoky Bonfire Bangers (Sausages)


I cannot begin to fully explain just how delicious this combination of “bangers” (sausages), with onions and peppers taste. The smokiness taste comes from the sweet smoked paprika and the explosion of dynamite is in the addition of a little cayenne pepper, (of course you can make the explosive taste more or less to your own taste requirements). Instead of frying onions off to serve in the traditional way with sausages in a roll (hot dogs), onions and peppers are cut into chunks. These are then placed into a large roasting tin with the sausages and as they cook the juices mingle from the sauce and sausages through into the onions and peppers - yum! Served in crusty or soft rolls this is absolute perfection for any Bonfire party. Just up the quantities if you want to serve to a larger crowd!


Dynamite Smoky Bonfire Bangers (Sausages)


Serves 6

Ingredients
450g (1 lb) chipolata sausages – I used Lincolnshire sausages
2 red onions, cut into wedges
2 red peppers, cut into wedges
1 orange pepper, cut into wedges
For The Sauce
8 tbsp tomato ketchup
3 tbsp brown sauce
Dash of Worcestershire sauce
1½ tsp sweet smoked paprika
A good pinch of cayenne pepper
2 tbsp clear runny honey
1 clove of garlic, very finely chopped
Dash of lemon juice
To Serve
6 bread rolls, crusty or soft

Method

You will need a good strong baking tin that doesn’t buckle in the heat.

Pre-heat the oven to 220°C/fan oven 200°C/ 425°F /Gas mark 7

Firstly make the sauce by adding all the sauce ingredients into small bowl. Mix thoroughly and leave to one side.

In a large roasting tin, add all the vegetables and sausages and pour over the sauce. Either with a large spoon or clean hands coat all the vegetables and sausages in the sauce. Place in the oven and cook for about 45 minutes or until the sausages and vegetables are cooked, turning over the ingredients once or twice whilst cooking.

Serve in bread rolls.

Saturday, 3 November 2007

Toffee Apples & A Little Bit of Hokey Pokey!!


Here is my next installment of Bonfire Night treats! I’ve been making toffee apples each year for Bonfire Night since time began or so it seems! I started this ritual instead of buying those deep-red-coloured bruised variety that are on sale in the stores. They are SO much fun to make, not to mention a gorgeous coating of lush crackling toffee to get your teeth into!


Toffee Apples

Makes 8

Ingredients
500g(1 lb 2 oz) Demerara sugar
2 tsp vinegar
50g (2 oz) unsalted butter
50g (2 oz) golden syrup
150ml (5 fl oz) water
8 medium apples, washed and dried

You will also need 8 wooden sticks and advisable a sugar thermometer. A baking tray lined with a non-stick mate to place the toffee apples on to set.

Method

In a saucepan add the sugar, vinegar, unsalted butter, golden syrup and water. Place over a low heat on the stove and stir until melted. Bring the mixture to boiling point then boil for about 12 minutes or until a sugar thermometer reaches 140°C and the mixture is golden.

Take the wooden sticks and insert them into the stalk end, now carefully dip each apple into the very hot toffee mixture in a swirling motion making sure each apple is coated well. Place on the non-stick baking mate to set for about 10 minutes.

Wrap in cellophane or like I do in cling film.


Hokey Pokey / Cinder Toffee / Honeycomb


Hokey pokey, something the Domestic Goddess Nigella Lawson herself states, “no one can resist”, the recipe can be found in her new cookbook “Express”. This is fast, fun and very easy to make. I placed my hokey pokey mixture on a Teflon baking mate to set and it broke easily into shards of wonderful golden deliciousness. A great little recipe to make for Bonfire Night or even for a treat when you have that “Crunchie” feeling coming on.
Hokey Pokey
Ingredients
100g caster sugar
4 x 15ml tablespoons of golden syrup
1½ teaspoons bicarbonate of soda

Method

Put the sugar and syrup into a saucepan and stir together to mix. You mustn’t stir once the pan’s on the heat.

Place the pan on the heat and let the mixture first melt, then turn to goo and then to a bubbling mass of colour of maple syrup – this will take 3 minutes or so.

Off the heat, whisk in the bicarbonate of soda and it will froth up the pan. Turn this out immediately onto a piece of reusable baking parchment or greased foil.
Leave until set and then bash at it, so that it splinters into many pieces.

Makes 125g.

Friday, 2 November 2007

Toffee Apple Cookies & Toffee Apple Delight Bonfire Night Cake

Every year on the 5th November, in the U.K. we celebrate the Gun Powder Plot to blow up the Houses of Parliament, which took place on the 5th November 1605. People build bonfires and make a Guy (an effigy) to burn on the top. The Guy represents Guy Fawkes who was one of the conspirators in the plot. Fireworks light up the night sky and sounds of booms and bangs can be heard from afar. Food is served at these gatherings, such as hot dogs (sausages in rolls with onions), baked potatoes with fillings, mushy peas, mugs of steaming soup, sticky toffee apples etc.

To kick off this event I’ve started already with a few bakes of, Toffee Apple Cookies and my own Toffee Apple Delight Bonfire Cake. The cookies have delicious chewy toffee and dried apple in them that are perfect for this occasion. My Toffee Apple Delight cake is keeping in with the theme too. It has moistness from the grated apple, a toffee flavour from the dark brown sugar with the enhancement of pecans, mixed nuts and Apple Brandy.
Toffee Apple Cookies


The toffee apple cookies are from Good Food and you can find the link here to the recipe

Toffee Apple Delight Bonfire Night Cake

Toffee Apple Delight Bonfire Night Cake

Serves 8

Ingredients
225g (8 oz) self-raising flour
150g (5 oz) soft butter
150g (5 oz) soft dark brown sugar
50g (2 oz) mixed nuts, chopped
1 large Bramley cooking apple, peeled, cored and grated
4 tbsp Apple Brandy, I used Calvados
2 large eggs
4 tbsp milk
½ tsp cinnamon
For The Topping
50g (2 oz) pecan nuts
1 tbsp Demerara sugar

You will need a 20cm (8 in) springform tin, grease the whole tin and line the base with baking paper.

Method

Preheat the oven to 180°C/fan 160°C/350°F/Gas mark 4.

In a bowl add the butter and sugar and beat until soft and fluffy. Add the eggs one at a time beating in until all combined. Next add the milk and apple brandy then beat in well again. Add the nuts and grated apple and fold through the mixture until all are mixed through. Fold in the flour and cinnamon gently, until all traces of flour are combined into the sponge mixture.

Spoon the mixture into the prepared cake tin and smooth the top with a spatula. Decorate around the edge and middle of the cake with pecan nuts. Lastly sprinkle over the top the Demerara sugar.

Place into the oven middle shelf for 40 – 45 minutes or until firm to touch and a skewer inserted into the middle comes out clean.

Leave the cake in the tin for 10 minutes before turning out to finishing cooling on a wire rack. When cool peel of the baking paper at the bottom of the cake.

Note. This cake would be delicious served for dessert with a toffee sauce.